Separation Anxiety–Relaxation is Possible!

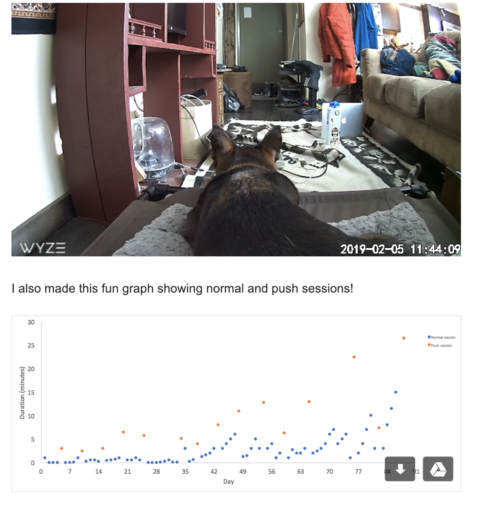
Moose’s mom’s chart showing progress over time/Moose relaxing during a SA exercise!
Separation anxiety is a panic disorder associated with your dog feeling anxious, stressed, and afraid when left alone. Each dog may manifest this anxiety differently. However, the hormonal and neuro-chemical processes which occur when fear and/or anxiety are triggered means that your dog is unable to control his resulting behavior.
Have your neighbors complained about your dog barking when you aren’t home? Do you return to find shoes, pillows, couches, or walls chewed up? Does your dog become stressed when you begin to get ready to leave the house?
These could be indicators that your pup might be suffering from separation anxiety. With true separation anxiety a dog is only comfortable with one specific person, however a more common scenario is where the dog is relaxed as long as there is (any) human accessible. This version is known as isolation distress, however also falls under the umbrella term separation anxiety.
Getting Started
To begin, the good news is that separation anxiety work is done remotely—as to be present changes the dynamics of the situation. A computer, wifi connection, and smart phone are all the tools and technology needed to get under way.
Step one is to do an assessment. This enables you to determine the starting point. It allows you to decide where to begin the training. The next step is to manage the situation so that your dog is not left alone for longer than he can handle. This is important in preventing rehearsals of the unwanted behavior while working on the problem. Finally, step three is a carefully crafted program of desensitization. To recap:
-
-
- Assess
- Manage
- Desensitize
-
An assessment is generally done via a platform such as Zoom or Skype. The goal of the assessment is to determine the point where your dog demonstrates an escalation in anxiety . Now you know where to start with the desensitization process.
Management can be comprised of many collaborative components. Doggy day care, pet sitters, neighbors, and friends can help in avoiding more alone time than your dog can currently calmly handle while you work on the issue.
Lastly, helping your pup to feel more confident and comfortable when by himself is possible via a specific program of desensitization. This means very, very, very slowly you will begin to build alone time duration. You’ll work at a pace that your dog dictates via his body language responses.
At the start it might be desensitizing to your movements—before you even leave the house. Later it may mean working in increments of seconds, then minutes before gradually putting those seconds and minute blocks of time together to get to real, appreciable absences.
Desensitizing to micro-criteria breaks may look something like this:
|
Walk to the door, touch the doorknob, return and BTN (back to normal) |
| Walk to the door, open the door door half way, close the door, return and BTN. |
| Walk to the door, touch the doorknob, return and BTN. |
| Walk to the door, open the door door half way, close the door, return and BTN. |
| Walk to the door, touch the doorknob, return and BTN. |
| Walk to the door, open the door door all the way, without exiting, close the door, return and BTN. |
| Walk to the door, open the door door half way, close the door, return and BTN. |
| Walk to the door, touch the doorknob, return and BTN. |
| Walk to the door, open the door door half way, close the door, return and BTN. |
|
Walk to the door, open the door all the way, exit, close door behind you, keeping hand on door know immediately re-enter, close doors, and BTN |
Noting and working on pre-departure cues (PDQs) is a key factor too. Your dog may start to feel anxious before you even leave while you begin getting ready to depart. Exposing your pup slowly and intermittently to the relevant PDQs and adjusting criteria in tiny increments can eventually lead to a dog who is relaxed for longer and longer durations.
Working as a team includes liaising with your veterinarianalso. Often a combination of medication plus behavior modification can help to yield the results you are seeking. The goal of medication is not to sedate the dog, but to allow your dog to relax enough to be able to gain some traction on the behavior modification protocol.
Resolution is generally reached via a lengthy process. But, in the end you will feel less trapped and isolated and more calm and confident in the fact that the chronic anxiety often associated with separation anxiety will be replaced by peace in your home.
If your dog is struggling when alone, you can schedule a brief 30 minute (no cost) consult to discuss how I can help!

 Does your deaf dog look away, look at you out of the corner of his eye, turn his head in the other direction, or move so he can’t see you when you are giving him a cue?
 When training any new behavior you always want to begin in the least distracting environment possible. This might mean starting your loose-lease walking training inside of your house.